A chainsaw blade is another term for a chainsaw bar. It is the part of your chainsaw that sticks out from the engine and serves as the guide for the chain to spin on. It keeps the chain in place and makes sure it remains straight while it’s being used.
The size of a chainsaw bar depends on how you’re going to use it. For example, if you’re using it to cut firewood, then your chainsaw bar’s size has to be at least 2 inches longer than the firewood.
The most obvious place to look for your chainsaw blade’s measurements is the product manual or on the bar itself. Some brands stamp the measurements on one side of the bar. But if you’ve either lost the manual or the stamp has faded away from use, you will have to resort to measuring the chainsaw manually.
This article will teach you how to measure a chainsaw blade and find out the length of a chainsaw chain.
Table of Contents
Terms to remember
Hopefully, you’re already familiar with the parts of a chainsaw. If not, here is a quick refresher on the parts we will be focusing on as we try to measure the blade and chain manually.
Chainsaw bar
The chainsaw bar is where the chain sits. It is the part of the chainsaw that juts out from the engine and is where the chain spins when you turn on the machine. It is a flat piece of metal with grooves for the drive links.
Gauge
Gauge refers to the thickness of the drive links. They are there to make sure the chain does not slip off the bar. Match the gauge rating with the chainsaw’s blade.
Pitch
The pitch is the distance between each drive link. To calculate for the pitch, you have to measure the distance between three drive links and divide it by two.
Drive links
Drive links secure a chain to the bar. They fit into what is called a bar groove. Drive links are found on the bottom of the chain, opposite of the cutting teeth.
Rivets
Rivets are small studs or pins that hold the drive links and the chains together in the chainsaw.
When should I replace my chainsaw chain?
Chainsaw chains can last you decades if you don’t use your chainsaw all the time. However, if the chainsaw chain is used often, especially when cutting wood, it will only last about 5 years. There should be good and regular maintenance after using the chains in order to make them last longer. The lifespan and quality of the chain is affected by its maintenance.
If the chainsaw chain isn’t functioning as well as it used to despite regular and careful maintenance, it may be time to replace it.
Listed below are possible signs that may need a chain replacement:
- Broken or worn-out teeth
- Chain tension is either too loose or too tight and cannot be adjusted
- Signs of smoke while in use
- Sawdust residue, not wood chips
- Rattling of chains
- Unbalanced chains
Observe proper maintenance of the chains to avoid them from dulling out. Not only is a dull chain useless, but it is also quite dangerous.
Measuring a chainsaw blade
Size of bars may depend on the chainsaw’s engine power. For instance, the longer the bar, the more power is needed from the chainsaw’s engine. It’s a given that only some chainsaws are able to handle multiple bar lengths. Every chainsaw has its own particular size, so chains should not be stretched.
Electric chainsaws can only handle bar lengths up to 18 inches or less due to the lack of power from the chainsaw’s motor. In order for users to utilize a longer bar and chain on an electric chainsaw, a chainsaw must require a huge amount of power.
Gas chainsaws, however, can handle blade lengths as long as 72 inches due to its strong engine power. A chainsaw bar’s measurements required when buying a new chain.
Here are examples of these blade measurements:
Effective cutting length
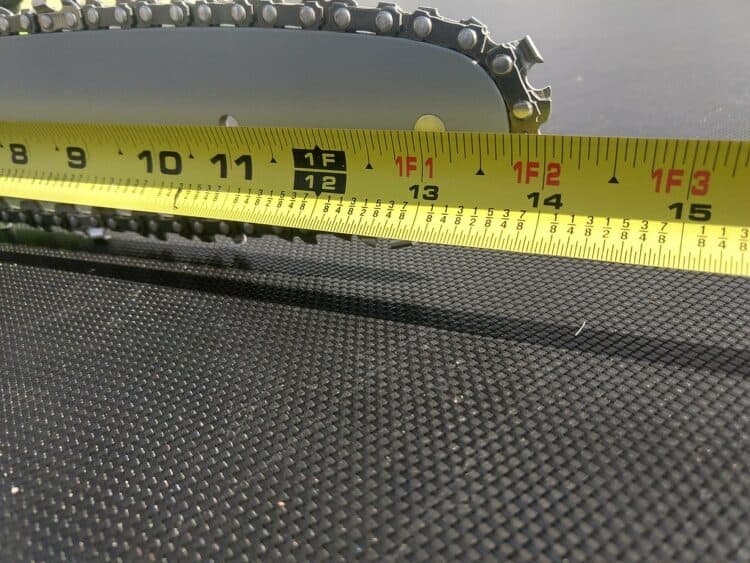
All that’s needed is a tape measure. This is the easiest blade measurement because it is based on the length of the blade from tip to the base of the chain. Begin at the base first. Once the tape is done measuring from the base to the tip of the chainsaw, it’s necessary to round the number up to the nearest even number (no decimals or fractions).
For example, the measurement is 16 ¾, then it should be 18 inches. Since it’s the nearest even number, avoid using odd numbers as the final measurement. 16, 18, and 20 are the usual blade measurements.
True length
With the use of the tape, measure the uninstalled chainsaw bar from both ends of the bar. The process is to simply unscrew the bolts (right side near the blade’s base) in the chainsaw and pull out the bar that’s attached to it.
Place the bar flat on the table or the ground and measure the distance. Since this is an accurate (true) measurement of the blade, there’s no need for further adjustments and rounding up.
Don’t forget to take these two measurements when shopping for a new blade.
Measuring the length of the chainsaw chain
Aside from measuring the blade, it is quite challenging to measure the chain unless of course there are already stamped measurements (ID code created and used by manufacturers) on the blade.
These stamped numbers are found at the end of the uninstalled blade. An example would look like this: 3/8” 72 1.3 mm/.050 (pitch, drive links, and gauge respectively).
But if there are none or they are erased from constant use, these are three measurements needed for the chain replacement: pitch, gauge, and drive links.
Listed below are the proper procedures when measuring the length of the chainsaw chain:
- Each and every drive link and lug should be counted one by one
- Get the measurement of the pitch
- Get the measurement of the gauge
You can do this by measuring the distance or length between these three consecutive individual drive links held together by rivets.
Proceed dividing the number of drive links into 2 for the pitch. 1/4 inches, .325 inches, 3/8 inches, and .404 inches are the usual pitch sizes.
You can do this by measuring the chain’s thickness on the groove (trench) where the blade fits. Tape measure is a handy tool to find the gauge measurement. Another optional tool is to use the blade and some coins.
A dime (.058“), penny (.043”), or a quarter (.063”) is necessary for this method. By using these coins, slide each and every coin into the blade’s groove. The coin that fits the blade the most (without a hint of force) is the blade’s gauge measurement.
The most common gauge measurements are .043 inches, .050 inches, .058 inches, and .063 inches. The size of the dime is usually the common size for the gauge measurement. .043 is a rare gauge measurement.
The length of the chainsaw chains is determined by the pitch and the number of lugs. Avoid guessing the lengths of the chainsaw blade and chains. They are not interchangeable. Incorrect length sizes installed into the chainsaw will result in damage on the power tool and possible injuries.
The chainsaw’s manual can help in choosing the appropriate chain type. When uninstalling the blades or the chains, always unplug the battery or the spark plug to avoid starting the chainsaw by accident.
Changing the chainsaw chain
It is quite difficult to replace and reattach a chainsaw chain, especially when the chainsaw has moving parts. After purchasing the correct size, installing it is the tricky part.
For preparation, get your scrench and the gauge tool. Scrench, a portmanteau of screwdriver and wrench, is used for chain loosening or tightening. Prepare the gauge tool for clean-up and maintenance on the chainsaw blade later.
Warning: Never forget to unplug the chainsaw if you decide to replace the chain.
These are steps on the chain installation:
- Use a scrench to open the casing of the chainsaw by removing the bolts
- Take the panel out by lifting it up
- Carefully remove the blade (along with the chain) off from the chainsaw
- Take the chain off from the blade
- Check the chain as it can be dulled out from too much cutting
- Clean both the bar track and the oil hole from sawdust residue or dirt
- Remove the metal burrs by filing
- After cleaning the blade thoroughly, always clean the sprocket
- Wear protective gloves
- The front panel should be screwed back on in reverse with a scrench
Among two sides of the panels, only one panel (front panel) can be opened.
Measuring the track height should be maintained since it may be damaged due to excessive chain friction. Use a gauge tool to inspect the track height. It’s best to replace the blade if the track height is below the specified height.
The instructions regarding the blade height may vary depending on the blade’s manufacturer.
Remove any dirt or object that may get stuck on the chains which may throw itself away from the chainsaw. Make sure the oil hole isn’t clogged.
Metal burrs are just bumps on the blade’s exterior surface. Always check this early, so it will be easier to remove the metal bumps on both sides of the chainsaw. Use any kind of metal file.
The sprocket is cylinder-shaped and is used to support the chain as it turns from the engine’s power. Gauge tool, a rag, or an air compressor can help clean off the sawdust, oil, grime, and the dirt.
Proceed to re-assembling the bar and the chain by wrapping the new chain around the cleaned blade carefully. Since this is a new chain, it’s very sharp. Handle it with caution.
The lugs or the drive links should be attached to the blade track. Sharp cutters are placed outside. Attach the blade and chain back carefully to the chainsaw’s body.
Make sure to adjust the chain correctly using the scrench’s screwdriver. Tighten it at the right tension level. To check, pull the chain on and see if the drive links aren’t free from the blade track. If they are, it means it’s too loose.
Avoid overtightening, because it might overheat. Always check the tension of the chain regularly
If still uncertain with replacing the chain, it’s better to ask for a professional’s help or someone with experience.
What do the numbers printed on the chainsaw mean?
Chain markings consist of words and numbers that are stamped or imprinted on chainsaw chains. These are actually ID codes or pitch and gauge measurements of the chain which are created and utilized by manufacturers.
It’s intended to determine the compatibility of the chain and the chainsaw. Chain markings have charts from leading chain brands such as Oregon, Husqvarna, and Carlton.
Chain markings may differ depending on the brand. For example, in Stihl chains, the chain markings are located on the chain’s drive links and tooth links.
Tips for proper maintenance of the chainsaw
Replacing the blade, the chain, or the tool itself is recommended since it will eventually break, malfunction, or dull out. However, to make the tool and its parts last long and cut nicely, the tips below are useful in order to prolong the lifespan and the state of the chainsaw and its parts.
Tips:
- At every gas tank fill up or every two hours, make sure to sharpen the chain
- Apply oil on the bar and chain thoroughly to avoid the parts being bind up or for easy maneuver
- During the chain sharpening, maintain a depth gauge inspection at least 3 to 5 times
- Frequently rotate the chain so that it lasts longer
Conclusion
It’s very important to measure the length sizes of the chainsaw blade and the chain accurately. You must not guess the sizes and hope for the best. This can damage the entire chainsaw in the long run.
And of course, always be mindful of your safety. When handling chainsaw blades and chains, wear the right protective gear.


