A beginner’s guide in landscape concepts, drawing, and design
How do you learn landscape concepts? Firstly, by drawing it, and along comes many challenges.
It can be an intimidating task if you do not have the talent and a drive to do it right. However, once you are adept with it, it will be as easy as pie.
Landscape concept design and planning can be difficult. But drawing it will make it easier. It will allow you to see the bigger picture of an entire property, where each particular component is, along with its dimensions and its relation to the other elements.
Getting to the level of a professional-type landscape design will take a lot of work. In truth, this type of knowledge is learned in architectural college and is a big deal. However, with a lot of elbow grease, you can reach that level if you put your mind to it.
Yet, it all boils down to the particular project you are working on. Does it call for exactness in details that have the quality of a professional landscape plan?
If you are only working on something simple like setting up a plant bed on a new area in your property, you do not have to make a professional-level landscape plan. A simple sketch will do the trick. You can upgrade it by adding in measurements to get the spacing correctly.
How can you tell that you require professional concept plan landscape design? One situation is when people move into new properties where the landscape is barren, thus needing lots of work. You have to develop and beautify it. So, you will need to make plans, and creating a landscape drawing is key.
The same thing goes for homeowners that are planning to renovate their properties. They can benefit from the knowledge this can contribute to the betterment of their properties.
Yet, in these situations, professionals are usually called to embark on these specific projects, and the knowledge is still beneficial to you. It would be easy for you to put in your particular input on the project and be able to understand what is going to happen.
A well-conceived plan will let you look at the big picture and understand how each portion operates and intermingle with each other.
The concept of landscape planning is usually an evolving chore. Your survey, draw, assign measurements, add important notations, experimenting with the data until you come up with the concluding plan. The entire course of action involves three components, and each necessitates drawing.
To learn the basic landscape design concepts, you have to be familiar with geometry, which you have taken in high school. It also involves a lot of measuring.
This task requires a bit of obsessiveness and how methodical you are willing to be. The more information you can gather, the better the landscape drawing would be.
If you endeavor your amateur drawing to look pro-level, you need to fully commit to it and get professional drafting materials like drafting paper and a drawing compass.
For this project, this will only be discussed in simpler terms to satisfy a DIYer such as yourself.
Table of Contents
Scale drawing
Beginner-level creative concept landscaping begins here. The first thing that you need that is truly important is a map of your property. Once you have bought yours, you should already have a deed map. If not, you can get a copy from your local property records office.
The map would show your whole property’s measurements, where your house is located and directly connected to the borders, and probably where the below-the-ground utilities are situated. If the map does not show the underground faculties, you can get it from your local utility office.
The deed map will invariably help you in this endeavor. It will guide you in the right direction and orient you properly on the right course of action.
Even though it has measurements of the different areas, you still need to measure on your own. You can make comparisons and adjustments, where each component needs specific work or not.
In the first stage in creating a scale drawing of your property, you will need a one-hundred-foot tape measure and a lot of graphing paper.
In the second or third stages, you will need additional materials like colored pencils, carbon paper, tracing paper, and blank paper. You will also need wooden stakes and a ball of string. It would be a good idea to get the complete materials now before getting to the next stages.
The graphing paper is the best paper for your drawing because there are already vertical and horizontal lines that have equal spaces. It will enable us to be as precise as possible and also make the necessary adjustments.
The areas are divided into exact measurements, which is essential for scale drawings. It is crucial information because you will know which part is concerning the other.
For example, if you are planning to build a patio near your front yard, you will know how much space you will need to construct it.
The squares on your graphing paper can represent one square foot of an area in your property. It is the “scaling down” of the location to fit in the graphing paper.
You will first need to measure your entire property with measuring tape. You will need the dimensions of the four boundaries because it will largely benefit you where your house is, in connection to the boundaries.
Then you have to find out the location of the other components in your property (gardens, patios, walkways, etc.). Indicate exactly where they are. Then measure each of the locations in connection to the other elements already established.
Each position is measured concerning each component to get them as many points of reference you can in the drawing.
You will need to embed stakes on the ground to get the points of reference required. Tie each one with a string to connect with another point. This way, you will get straights lines that are necessary for your scale drawing.
Record all necessary measurements, then scale them down to fit the graphing paper.
Bubble diagram
Once all of your property’s landscape design concept ideas are scaled down on graphing paper, put a tracing paper over it. It will still enable you to see the scale drawing, so begin to trace over and copy it without the grid lines.
Once you are done, then find the area that you have wanted to renovate, like the example of the patio near your front yard.
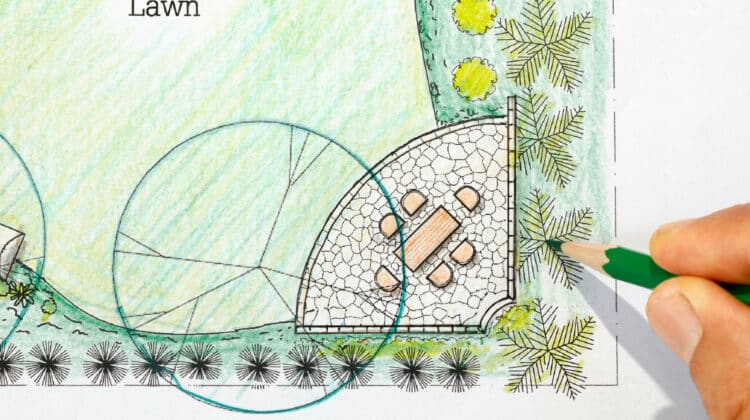
Then set boundaries on each component in your property by drawing circles for each one. Once finished, it will look like many bubbles drawn on paper. Put a label on each bubble so that you will know what they signify.
The places outside of the bubbles might be the pathways to go from each bubble, then label them as well.
It would not be the final interpretation of the bubble plan garden design yet. You might change some portions as you continue, so you only need to retrace the scale drawing with tracing paper.
Before making the final version, make sure everything is stable. You can do this by driving stakes on one of the bubble areas and tie strings on the ends. Do the same on the other bubbles.
Then walk within them to check on the current patterns of traffic. Does your layout make sense for you?
Once done, take all the needed dimensions for your final landscape drawing.
The final drawing for landscape concepts
For this final stage, get a spare copy of the scale drawing and transfer all the gathered measurement data from the bubble diagram. Continue to follow with the scaled measurements once transferred.
Now, it is time to incorporate the patio near your front yard as the crucial element in the final version. Continue in following with the scaled-down measurements.
It will be easier to signify an area with single letters only, like a “Y” for “yard,” along with the meanings below. You should also record all significant information, like measurements, in a separate notebook.
Once you are satisfied that your drawing is correct, get carbon paper and put it on top of the blank sheet. Then put the updated version on top of the carbon paper.
Then trace all of the details on the carbon paper, which then is carried over to the blank paper. It would now serve as the finalized drawing for your landscape plan.
Then take out the colored pencils and color each component with the appropriate tinge. For example, water can be blue, green for grass, etc.
It will make it more appealing to the eyes and make each portion distinguishable from the others.
Conclusion
You might encounter some difficulty with this procedure since this is what professionals formulate once hired for landscape planning.
However, if you want to carry out the main principles of landscape design, you should adhere to the harmony, scale, and balance that landscaping concepts offer.
So take out your drawing materials and create the best landscape design you can!


