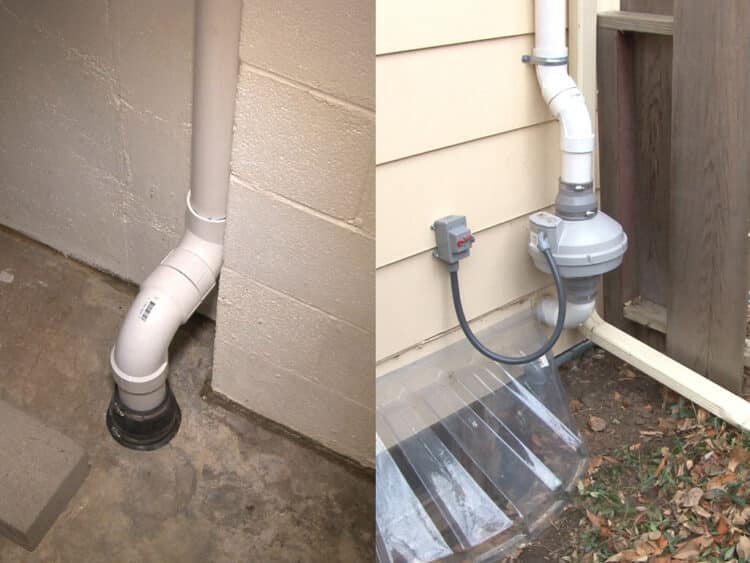
Once you find out you have a radon issue in your home, it is customary to start looking for effective ways of fixing the problem coat.
On average, you may have to pay professionals an average of $1000 to $52500 to install a passive radon system. But this is something you can do yourself.
If you choose the DIY route, you only need to buy the necessary materials costing half the price of paying a professional and handle the work yourself.
All you need is some electrical, plumbing, carpentry, and handy skills to achieve this. And, of course, a guide with simple steps to follow.
Read on to find out how to do it.
Table of Contents
What is radon?
Radon is a radioactive gas that’s odorless, tasteless, and colorless. Usually, it seeps out of soils and into your home.
The most probable place to test for radon in your basement, where you may get extremely high levels. If you keep breathing it in- even tiny traces of it- you are at risk of getting lung cancer.
That is why you need to install a mitigation system to get rid of it. Additionally, you have to test your home for it rather than ask a neighbor if they have any traces of it.
That’s because your home can have it but not your neighbors (yes, even if it’s pretty new).
So how do you fix the issue?
Steps to installing a passive radon system
Depending on the levels of radon in your home, there are numerous ways of fixing the issue. If you have only a small radon group in your home, you can fill up all gaps and holes to prevent any more from coming into the house.
You can use expanding foam or hydraulic cement to fill bigger gaps and caulk for the smaller openings. However, sealing doesn’t solve your issue.
If you test again and find the levels or radon increased from the previous testing, it’s time to install a mitigation system.
Additionally, even when the levels are high initially, it’s still important that you fill and seal those cracks and gaps before installing the system.
Here are steps you can follow:
Step 1: Find the foundation footing
Since you need to position the PVC pipe near your basement wall, you need to find the foundation footing.
That way, you can tell whether the footing will in the way of installing the pipe. To find out, use masonry drill bits that are at least 12-in. long to drill a test hole since concrete slaps are usually at least 4-in. thick.
If you hit the footing in the first test hole, try again by drilling another test hole a little bit farther from the wall.
Do this until you no longer hit the footing. And don’t worry about the holes. You can always patch them up with patching cement once you’re done.
Make a hole that’s slightly larger than the PVC pipe
You need to make a big enough hole to fit the PVC pipe but still give it enough wiggle room. That makes it easier for you to get rid of all the gravel and soil.
If you don’t have the tools to carry out the job, you can rent them from your local home center. Or you can draw the circle the old fashioned and easy way.
You can draw a circle at least 6-in. wide and use a masonry bit to make tiny holes all around the circle closely packed.
Afterwards, you can use a hammer to hit the middle of the hole until its breaks through.
Make a hollow suction pit
It would be best if you made this suction pit right underneath the hole. There is where the radon will accumulate before getting sucked up the pipe and out of your home.
Of course, you first have to get rid of all the gravel and soil or any base material that’s under your concrete slabs. If you used tighter soil types like sand or clay, you have to get rid of at least 16 gallons of it or more.
You can use a vacuuming while hand digging to get rid of all that soil. But if the material is loose like gravel, you can suck it up using a shop vacuum. Besides, you only need to get rid of about five gallons of loose gravel.
Dry fit the piping first
You need to confirm that the hole is big enough for the pipe and fittings. The only way to do that is by dry fitting it.
If everything fits properly, then it’s ready for gluing. Remember that once you add the clue, the piping will be permanently fused in place. That’s why you need to be sure it all fits without much hassle.
Install fire barriers in your garage
Possibly, you may have to route part of your PVC pipe through your garage. If that’s the case, you need to fix fire barriers pipe collars in areas where the +pipe is going through your ceiling or a finished wall.
You can get them from the home store or online at $40 or $50/, which can help you prevent fires from spreading or at least slow down the spread.
But what about in cases where you don’t pass it through your garage?
Cut a hole in the rim joist
If you don’t pass your piping through the garage, it means you plan to run it directly through your basement.
If so, buy a hole saw and use it to cut a hole in your rim joist. The best hole saw is one with a 4-1/2-in—wide- diameter that matches a PVC pipe of the same external diameter.
That can help you cut the perfect hole for the pipe that fits snugly. Firstly, cut a locator hole inside the basement with a drill before using the hole saw to cut the hole outside.
Seal the pipe
Now that the pipe fits in place, it’s time to fill the gap between it and the concrete. Start by stuffing a little foam backer rod before applying a generous amount of fast setting patching cement.
Install a warning device
Just in case your radon fans stop working and levels of radon start rising once again, you need a device to warn you for quick action.
A manometer is a perfect device for that. You can either choose a manometer (one filled with liquid) or electronic monitors.
If you choose the electronic option (mostly the safety siren radon detector), you will get an alarm sound when radon rises to dangerous levels. You can buy this device for $130 at an online store.
If you want a cheaper option, the liquid-filled manometer is an excellent option. It costs a little over $10.
You use it by mounting on the pipe and keeping an eye out for dropping liquid levels. If the level of the liquid drops, your radon mitigation system is not working, and you need to take immediate action.
Carry out another test
It’s now time to know if the radon fan is working correctly. If it is, your radon levels will be significantly lower.
If it’s not, then the fan is not functioning, and you need a replacement net. But this time, get a more superior fan. The company you bought your previous fan from can do the replacement if you contact them.
But that’s not your only option. Possibly all you need is an extra suction point, so you have two.
Factors to consider before installing a radon mitigation system
Now that you know how to install a mitigation system, you also need to understand factors that may affect the process or the radon fan’s efficiency once you install it.
It includes:
Your radon level
Whether you plan to have a pro over for the installation or you are doing it yourself, it’s important that you know your radon levels. That can help you know how easy or challenging your task will be.
For instance, if it’s 4pCi/L, you’ll have an easier time taking care of it. But a radon problem of anything over 21 is dangerous and more challenging.
When was your building built
It’s often easier to install a radon system in newer homes with more desirable fills under the basement floor.
If your home is older and has rock foundations or sand, you may have a more challenging time installing the system.
What’s the crawl space in your basement
The sq. footage of your basement directly affects the amount of work you need to reduce radon levels.
Also, if you have little to no crawlspaces, it’s hard to work under there. In some homes, your crawlspace is sealed with a membrane.
Additionally, find out whether your basement is finished or unfinished. If it’s finished, you may have to run the pipe up through a family room since it limits the ability to run it through the basement directly.
Final thoughts
Radon levels higher than four can be dangerous to you and your family. That makes it crucial that you do a radon test.
If the test shows significantly high levels, you need to install a radon mitigation system to deal with the situation.
With these tips and easy to follow steps, you can easily do it yourself and save on paying a contractor.


