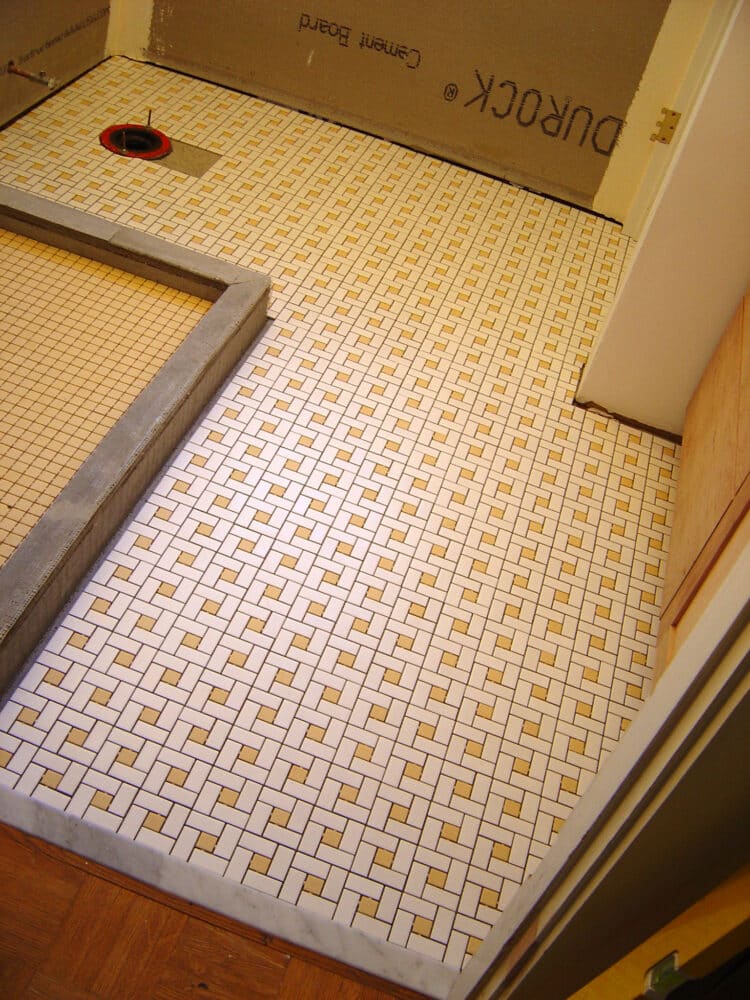
If you have a small living space and want to add a shower, you will need to install a custom shower base. You have to make sure that you construct it correctly wherein there is proper drainage it cannot be damaged by water.
You have to incline the floor in just the right way to channel the water towards the drainage system in the flooring. There are great floor coverings available in the market like tile, fiberglass, and acrylic. Water-based issues like mildew, mold, and wood rot can be avoided.
All you need to finish this task is basic skills in plumbing, a decent budget, and a few days. You can either remodel your present bathroom to include a custom size shower pan or replacing your old one. It is a manageable and achievable process.
Table of Contents
Why choose a custom prefab shower pan?
Many of today’s modern homeowners select this over using a bathtub because it can enhance the present one and increases the floor area. It can also trick the eyes into making the bathroom look larger.
Large bathtubs tend to take up space appear bulky than the sleek look of walk-in showers. The enclosure made of glass lends to the minimalist and airy aesthetic.
If you compare measurements, a bathtub area can take up a space of sixty by thirty inches, while a shower area can be compressed as twenty-seven inches. It will give the bathroom a roomier feel, making it inviting and open.
There is also a wide variety of custom shower pans that you can choose from. There are a variety of shapes, sizes, and design selections that any bathroom space can adapt. Due to that, homeowners can accomplish the design that they want with the least space necessary.
Custom made shower bases are also especially handy for homeowners with limited mobility. Along with shower seats, it will be more contributory than sitting down at the bottom of a bathtub. Its accessibility is a factor in becoming a necessary component in a highly functioning bathroom.
Tools that you need to fabricate a custom molded shower base
- Cordless drill
- Hammer
- Wood chisel
- Utility knife
- Bucket
- Caulk gun
- Chalk line
- Tin snips
- Rags
- Needle-nose pliers
- Level
- Framing square
- Handsaw
- Tape measure
- Pencil
- Electric screwdriver
- Protractor
- Disposable paint brush
- Notched trowel
- Sanding block
- Small foam roller
- Dust mask/li>
Materials that you need to create custom built shower base
- Tiles
- Tile spacers
- Dry mortar mix or ceramic floor mix
- Waterproof barrier
- One inch nails
- Four inch screws
- Shower drain
- Two inch pipe
- Two lumber boards (two inch by four inch by eight foot)
- Many extra boards (one half inch by two inch by seven foot)
- Thin set mortar
- Bullnose tile and or shower curb tile
- Grout
- Caulk
- Duct tape
- Fiberglass mesh tape
- Galvanized expanded metal lath
- Hardboard siding
- Shower drain assembly
- String
- Tile backer board
- Vinyl membrane
Types of tiles
- Porcelain
- Ceramic
- Marble
- Glass
- Natural stone
Think about the style, size, and shape of the best custom corner shower for you
Are you thinking about what is the best way to construct a shower area where there was none beforehand? You need to prefabricate to make everything easier. There are many models available in the market today that can fit to whatever free space you want to put it in.
If there is nothing that you can find that is ideal for you a fits your intended location, you can build one on your own with tiles, concrete, and stone.
When choosing what may be the right shower pan for you, either custom-made or prefabrication, think about the following first:
The doorway
The best shower pans ever built does not take up much space in the corner of the bathroom. When thinking about the right custom tile shower size, you also need to consider the space where the doorway for the shower enclosure will be situated.
There are many styles of shower stalls and doors you can choose from: swinging or sliding doors, side of corner doors, or no door whatsoever.
In European countries and Mexico, they have distinct and popular styles that homeowners use. They either do not have a door or only have a shower curtain to hold back the splashes.
Each style has advantages and disadvantages.
A swinging doorway needs to have enough space for the door to open without hitting any bathroom fixture. If your toilet space is already cramped, then this option would not be ideal.
A sliding doorway needs enough space to draw back and forth. So one side to have twice the amount of width space for the door.
No door means there is not construction necessary and is ideal for cramped bathrooms. However, water splashed would be an issue that you have to get used to.
Either option you have to decide beforehand. So that you can be sure how much space you have for the best type of shower pan you want for your home.
Deciding on the size
Take into account the proportions of the type of shower pan design that you want. You would need to ask yourself these questions:
How big are you? How much area do you require to be comfortable in showering? Will you be the only one using it, or will there be another person of either a bigger or smaller size?
Ready-made or custom-made?
Choosing the right custom shower pan drain for you depends on your particular situation and area in your house.
Do you need a prefabricated bathroom stall? It will be much easier to install. Or the customized area?
However, the choice does not depend on the area, but what would be appealing for you.
Bathroom pans that you can buy in a home center feature fiberglass, acrylic, or porcelain tiles, which only have limited designs and colors. However, customized pans give you a wide variety of options where you can let your creativity flow.
Custom shower pans and walls can increase the resale value of your home. You have the option of letting a professional contractor do the custom job for you. Or, if you want to test your DIY skills, then go right ahead. If you are used to manual labor and do not mind working with carpentry tools and equipment, then this whole project would work great for you.
Installation and construction of custom size shower base
There are many ways to do a custom shower base fabrication. Tiles already designed to be inclined will eliminate the motive for measuring the right slope for drainage.
Few companies manufacture these pre-inclined trays, so you might not find them easily.
However, you can do a traditional method wherein you will need to construct a custom fiberglass shower pan from scratch. You will do all the tasks involved, like pouring and shaping mud on the surface, waterproofing the whole spot, etc.
This entire job will take a few days of your time and would not cost you too much. Compared to hiring professionals, you would be better off.
Frame construction
Creating a frame for the base can be a difficult undertaking. While it is doable, if you do not have experience and lack the knowledge, it is better to get a professional contractor to help you.
- You have to take measurements in the entire shower area. Take the one inch by two-inch boards and tape them where the panels and door should be. Take note of the curb, which you have to leave markings. It should have a width of about three to four inches.
- Cut the board to the frame size. Measure with a protractor the angles needed for the inside and outside of the frame.
- Piece together the frame from the base, along with the inside and outside edges of the curb.
- Take out the taped boards, cut them directly on the markings, nail them to fasten the frame into place.
- With the cordless drill, insert screws into the floor in between the outer and inner edges of the curb, one foot each and each joint. This process will assist in connecting the floor to the curb.
Mix and pour the mud
- Take out the mortar mix and combine them based on the directions of the manufacturer.
- Pour the mix into the frame on the curb until it reaches the topmost portion. Be sure to make it as level as possible.
- Let it dry for one day. Then take out the frame and scrape smooth the mud mixture with a knife.
- Make sure the topmost portion is level by utilizing a level. Use a sander to make the lines as level as possible.
- The topmost portion of the drain should be two inches higher than the height of the floor. You have to leave markings on the curb and walls to a height of about two and three-fourth inches above the flooring to determine the quantity of mud you need to keep a three-fourth inch slope.
- Pour another helping of mud mixture into the surface pan. Combine them evenly with a trowel and make sure there are no air bubbles.
- Level out the surface with a level to make sure every pan sides incline towards the drainage.
- Let it dry and cure for three days before the waterproofing process begins.
- Use liquid waterproofing as paint and apply it to the entire pan perimeter, in every nook and cranny.
- Let the waterproofing coat dry, then paint the entire area with another coat. This additional coat will ensure that no damage due to moisture will occur.
Drainage and plumbing
When creating a fiberglass shower pan custom size, having a good drainage system is crucial. Most are particularly designed for two-inch pipes.
If you are not certain what size of pipes you are going to use, go with the bigger choice, which would be the two-inch pipes. It would stop any flooding from happening and enables any liquid to drain quicker.
The best-known types of drains come from ABS, cast iron, or PVC. These types are designed to have rims that adhere securely to the waterproof liner of the shower pan.
You can try to deal with the difficult task of drainage and plumbing, but the best option is to hire a professional to handle this. To make sure all joints are secure and do not leak.
Laying down your preferred tiles
If you have chosen the kind of tile you like better from the options (the cheapest is ceramic, and the most expensive is glass), then you can start installing them to your special order shower pan.
- Before laying down the tiles, make sure all the areas are correctly measured. Do a practice run and put down all the tiles in all the spaces they need to be. This way, you will know where you need to cut them and how everything will fit.
- Make the appropriate trimmings and lay them down again to check if they fit closely together.
- Before permanently sticking the tiles on the shower pan, take a rag and wipe any remaining dust and debris, which could stop the mortar mix from clinging.
- Pour the mortar on the surface and smooth it out. Make it as thick as a one-eighth inch. Utilize the notched edge of the trowel to draw slowly a second thinner layer, before smoothing it again with the flat part of the trowel. Slowly lay down the tiles for the last time, and wipe the mortar away from the tile edges.
- Make sure that the tiles around the drain are properly shaped to fit. Use a tile nipper for this task.
- Take the grout and mix it evenly. Use a rubber float to apply the mixture. Let it dry for a couple of minutes, then gently wipe it off the surface of the tiles.
Sealing, waterproofing, and caulking the custom made shower floor pans
After the tiles are properly installed, and the grout mixture has dried out (do follow the manufacturer’s instructions), make a watertight seal from the caulk all over the circumference of the drain. You will also need to put caulk on corners of the floor pan and any place where the tiles concur with another area. A good area to put it is where the floor and the curb join and also where the walls and the floor link up.
Let the caulk mixture dry first, then add the sealant material. At this stage of the task, your custom tile shower pan can resist water and ready for usage.
Replacing and removing old shower pans
If you are either converting your bathtub to become a shower stall or renovating a previously used shower, then you need to undergo a different process. You have to take apart the structure and build a new one.
- Take out the cover of the drain and stuff it with a rag before scraping along with the grout linear markings of the central tiles.
- Utilize a sledgehammer to club the tiles until it is forced apart. Use a chisel to slice down towards the waterproofing material.
- Insert a flat bar into the opening and below the bed of mortar before dislodging upward to demolish the whole floor.
- Clean away the dirt and debris before installing the new custom show drain.
Tips and tricks for DIYers for installing a custom shower base
- To properly install a custom shower pan with a bench, you have to thoroughly plan for it. Use all the time you want to think about the starting phases of the whole task. So that you can anticipate any problems in the future.
- Make sure you are wearing comfortable clothes. Wear a pair of sports knee pads since you would be kneeling while working a lot of times, and also wear a face mask to avoid breathing in harmful dust.
- Make it a habit to make measurements and calculations on anything that needs to be cut correctly. Leave clear markings on them so that you will know where to cut off. Smooth out the rough edges with an abrasive compound called “carborundum.”
- Do not work in a random manner, which means you have to do things in the proper order: ceiling goes first, walls go second, and floors the last task.
Installing a custom shower base is an achievable endeavor. If you do not have experience with this and are not used to manual labor, then it can be difficult and be somewhat overwhelming. If the task is overpowering you and has left you in a state of confusion and peril, then you need a professional consultation on what is the best thing to do. Or perhaps bring in a contractor to complete the task for you.
A summary
Now you have the right know-how in constructing the best custom made shower pan. With the right tools, materials, and a good amount of creativity, you can build from scratch the best and most visually-appealing shower stall that you can be proud of.


