Are you raring to remove rocks from yard, but you don’t know how? You might think it’s a hard undertaking, but it very doable. If you have the right tools and a ton of elbow grease, you can move mountains.
If you are a gardening aficionado trying to grow an expansive and flourishing garden or yard, your enemies are ugly rocks on the topsoil. You want to get rid of dastardly stones and pebbles as quickly as possible.
Rocks are not only regarded as an eyesore. They also have untoward effects on your beloved plants. If you want to remove them from your garden or yard, it is essential to know the most efficient ways to do it.
So now you’re thinking, how do I get rid of rocks in my yard? There are there three effective methods:
- Doing it manually by picking up bigger stones and sifting through the dirt to get the smaller pebbles.
- Utilizing a wheelbarrow and a tiller.
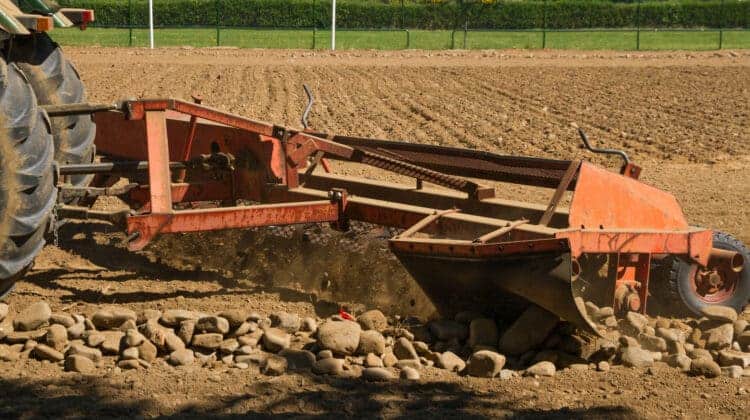
- Utilizing a plow, tractor, and sifter or metal screen to take out the stones.
Each will be explained further in succeeding sections. So if you’re earnest in the rock removal task for your lawn or garden, get ready to be rocked.
Table of Contents
Why should you remove rocks from yard?
Before learning how to remove rocks from your yard, you should know the reasons why.
Removing rocks from the soil is not only an uneasy chore, but they’re also a prohibitory element in your plants’ growth. A few stones scattered to a fro wouldn’t be an issue and would not steal nutrients supposedly for plants.
But bucket-loads of them will present a negative impact and make a difference. Since stones aren’t living matter and don’t take substantial nutrients from plant life, they can serve as an obstruction for roots to reach the essential resources for continuous growth and development.
When plants’ root system cannot get their vital nutritional elements, they are going to die. So the despicable rocks have to go.
Also, stones can acquire reserved growing space that was supposed to be for plants. They would not develop to full length and might have stunted growth like Japanese bonsai plants.
So it’s essential to remove big rocks from the yard, and even the small ones. It will de-clog and give growing and breathing space back to the plants. So they can grow to full bloom in peace.
Lastly, an overabundance of stones will enable the topsoil to harden. They will let the liquid nutrients readily escape from the soil. It, in turn, won’t let the plants soak it up, thus halting their development.
So, for plants to grow successfully, there should be ample space, nutrients, and water. A few scattered rocks won’t be an issue, but lots of them will prove to be a hindrance.
You have to remove them immediately and also add to your lawn or garden’s aesthetic value.
How to get rocks out of your garden
As mentioned earlier, there are three ways to remove rocks from the yard or garden. You can either do it manually, with a tiller and wheelbarrow, and with bigger plowing machinery (used for larger areas).
Even though the manual method might be taxing, it more effective than the other ways. However, it will take time and effort away from you, which could have been for other gardening aspects.
Utilizing a tiller, wheelbarrow, and rake will take minimal time to finish rock removal duty, yet might not be efficient as the manual process.
However, both methods are excellent alternatives. But it will be more evident in a larger property where a tractor or a plow will be more effective instead of removing them manually.
It will still be dependent on the people involved and how much money will be spent on the undertaking. So if you are only able to do it the manual way, then go ahead.
Don’t buy a tractor for that sole reason only. It will be too extravagant for such a menial task.
Here are the three methods explained in detail:
Manual
This task of removing rocks manually is perhaps the easiest job in the world. All you have to do is bend down, pick a stone, and put it in a pile. It won’t take a genius to do that.
However, this is often physically draining and back-breaking. If you don’t have a problem with exerting lots of physical effort, this will work great for you.
However, a problem might arise in setting enough time for this. Since the whole ordeal might take a while, and if you have lots of time to spare, then go ahead.
Along with your physical prowess, you’ll need a sifter or a screen, a shovel, and a container. Also, you have to wear comfortable clothes and shoes, along with gardening gloves.
Since this will take a few hours in the day, you’ll need to be as comfortable as possible.
- The first thing you’ll need to do is survey the whole garden or lawn area. Put some marking on the boundaries so that you’ll know the area you will be working with.
It will make the whole process more streamlined and efficient since you’ll get a general understanding of how many rocks you need to take out. - Look for medium and large-sized rocks first for removal. This task needs your physical strength since this entails picking them up and tossing them into a pile. Before bringing out the gardening tools you’ve brought, look over the whole area and begin removing them.
- After getting rid of the larger rocks, it’s time to deal with the smaller ones. With your shovel, dig about twelve inches into the ground and pour it into the container.
Divide the whole area and dig twelve inches in each section, and put the accumulated soil into the container. - Put the sifter or screen at the top of the container. You can or make one on your own with a chain-link or expanded metal.
- Lightly turn upside-down the container, and be sure to hold onto the sifter. The dirt will get through and leaving behind the bigger stones, which you’re putting back into the container.
- Once you are done sifting through the whole area, the container should be filled with all the remaining rocks. Then get rid of them, along with the larger ones.
However, if you don’t want to throw the stones away, there are ways to put them to new use:
- You can clean and polish them. Some people may think that rocks are useless, but once cleaned and polished to a high sheen, they will look beautiful. You can use the now fantastic-looking stones for decorative purposes.
- After cleaning, polishing, and even painting them, you can put them back to the lawn or garden. Find a good spot for them to beautify and add more aesthetic value to the area.
Tiller, wheelbarrow, and rake
The second procedure mixes the effectiveness of manual stone removal with the ease and carefulness of gardening tools. Removing rocks from the soil will not be as arduous as the previous method.
It is an excellent alternative for stone removal because you will use different tools and materials to finish the task faster and efficiently.
- First, you will need the tiller to loosen up the soil in the designated area. It is an easier process to do instead of shovel dirt section by section.
- You will still need to pick up medium and large stones and put them on the wheelbarrow. So that they won’t block the tiller from its tilling task.
- After tilling the whole area, use the rake to sift through the topsoil for smaller rocks and pebbles. After raking through every portion, pick the unearthed stones and put them on the wheelbarrow.
- If raking doesn’t work, you can put the tilled soil on the wheelbarrow that has a sifter on top. The soil will be sifted through, and the stones will remain on top.
Tractor, plow, and sifter
This procedure is effective for larger areas and can get the job done easier and faster.
- Start by connecting the plow securely to the tractor. Make sure this is done correctly to avoid any accident down the line.
- Drive around the tractor in the area. The plow will be loosening the dirt on the ground so that the rocks can be easily picked up.
- After the whole area is plowed, you can scoop up the topsoil to be sifted. Work on this in sections like the previous methods.
- Sift through the soil with the sifter. The rocks will remain on top while the soil will be sifted.
- Get rid of the rocks and put back the sifted soil to the garden or lawn. You can now do what you want with it, like planting grass or flowers.
Tips on how to remove rocks from lawn
To be more efficient in your residential rock removal, here are a couple of tips that you can do:
- Do not use a lawnmower. If it is purposely made to the task of a tiller, it will immediately be destroyed. The rotor blades are meant to cut grass, not sharp and hard rocks. So, don’t use it for that diabolical purpose.
Also, using for that purpose can be a danger to people nearby because it can throw discharged rocks at top speed. If you value life for people around you, DO NOT use mowers for tilling. - Before planting flowers or grass in your designated area, remove the stones first. Rocks aren’t good for plants close to them.
- When you dig with a shovel, make sure the depth is ten to twelve inches. Rocks can still be situated that deep, and it’s an important part of the soil where roots grow.
Ways to reuse rocks for landscaping purposes
The displaced rocks can be put to good use. Here are a few ways to repurpose them:
Make a fire pit
A great way to make use of the excess rocks is to create a backyard fire pit with them. All you need are the larger stones you’ve collected, some gravel, a rake, and a shovel.
Here how you can make it:
- First, decide where you want the fire pit to be and how big you’d like it to be. Pick somewhere about twenty-five feet away from any structure or trees.
- Once you’ve chosen an ideal spot, mark the center with a stake. Then tie a string to measure your preferred diameter, and walk around to outline the fire pit.
- Dig the whole area a few inches underneath the ground. It will provide space for non-flammable materials and also remove any flammable substances you might find.
Start placing the collected stones around until they are about twelve inches tall. - To avoid embers burning themselves into the ground, fill it up with a few inches worth of gravel or sand.
Make a retaining wall
It is an excellent use for the extra rocks. While ready-make interlocking blocks are specifically made for this purpose, you can use larger stones for this.
You can situate them at the edges of your garden flower beds. Compared to other DIY projects, this wouldn’t cost you a single penny. So collect those big rocks to make the retaining wall of your dreams.
Build a garden walkway
A paved walkway surrounding your garden is an elegant aesthetic, but if it’s made from the rocks you’ve collected, it will look doubly appealing.
This project can be done easily and only for one to two days. A stone pathway will provide a rustic appeal to your lawn and garden.
Conclusion
Once you’ve gotten rocks out from your garden or yard, you can now create the most beautiful garden you’ve always dreamed of. And you thought the stones you’ve amassed are useless, but in fact, it’s the total opposite. You can bring it back to the garden, clean and polished, for decorative purposes.


