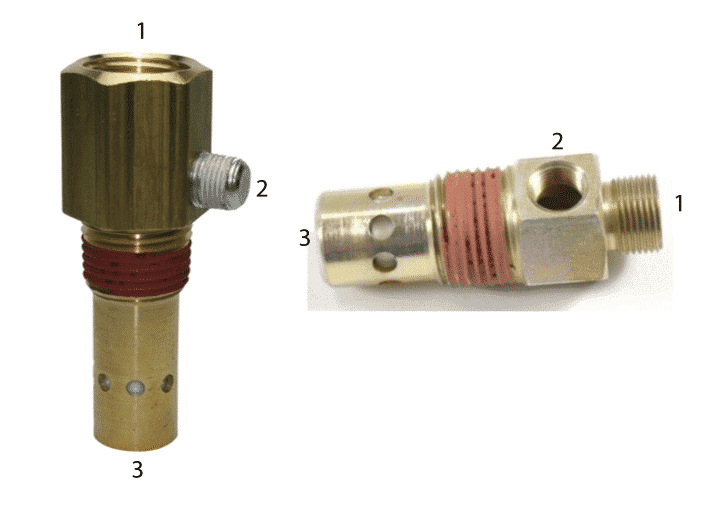
One of the crucial components of a portable air compressor is the check valve. This ensures that the unit can compress pressure correctly by facilitating the flow of the air in one direction.
In many piping systems, air moves through the pipe. There is a bulb that is designed to prevent the air from flowing backward. This is what is called the check valve. When the air flows at a certain pressure level, the valve opens. If the air, however, moves in the reverse flow, then the valve should close to prevent this. Sometimes, the valve may fail to operate as required. This causes issues for the compressor. Learning how to handle the problems associated with the check valve can help you maintain your air compressor in good condition. Read on.
Table of Contents
Why does a compressor require a check valve?
Ever air compressor includes a check valve to operate correctly. This valve has to keep a particular amount of pressure on certain parts. Once the valve opens, it allows the air to move forward and not backward. When the airflow speed starts reducing, then the valve should start closing automatically.
A check valve has many parts, including the body, seat, and cover. The seat handles the internal sealing. Apart from the main components of the check valve, it also contains parts such as the spring, disc arm, and hinge pin.
How to identify a faulty check valve – Air compressor troubleshooting check valve
In case you suspect that the valve in your air compressor is faulty, you should check out for the following signs.
Air leakage from the air compressor
When the air compressor is not in use; there should be no air leaking from the tank. If you notice that there is some air leaking, it could be a sign of a faulty check valve. Normally, the check valve should remain closed until a particular amount of pressure is exerted on the valve’s disc. If the check valve is faulty, it can open without reaching that particular pressure level. This is what may cause air leakage from the tank.
The slow buildup of pressure
Sometimes, you may realize low pressure coming out from your compressor. This could indicate a faulty check valve. When the flow of air is moving in the reverse direction, the pressure that the air compressor should produce becomes less. A defective valve can make the compressor take longer for the air compressor to build up enough pressure.
A strange noise
If you hear an unusual noise while using the compressor, it could be a sign of a faulty check valve. Look at the region around the check valve and confirm if the noise is coming from there.
Testing the check valve
Since a compressor can have different issues caused by various factors, you should conduct tests on the check valve to ascertain whether it is faulty or not. Before conducting any tests on the check valve, you should understand the two major ports that it comes with. A check valve has an intake and exhaust port.
The intake port is responsible for taking in air while the exhaust port releases the air out. To test the check valve of your compressor, you only need to blow through these ports. You should notice air passing quickly when you blow through the valve’s intake port. No air should pass through the exhaust port when you blow through it.
A faulty check valve, however, allows air to pass through the exhaust port. In this case, you should fix this problem instantly. One of the things that can cause the check valve to get damaged is excess air flowing through it. Reverse flow can also affect the valve disc negatively.
How to fix a faulty check valve – Air compressor troubleshooting check valve
Now that you understand what causes the check valve to stop functioning accordingly, you should learn the possible solutions to fix the problem. You can fix the compressor’s check valve in different ways. The simplest solution is to clean it. Sometimes, thorough cleaning of the check valve can make it function properly again.
Grime or dust tends to build up inside the check valve leading to the malfunction. Feel free to use soapy water to clean the check valve from time to time. You can also utilize a piece of cloth to get rid of any particles attached inside the check valve. Focus on parts such as the seat of the check valve since it tends to accumulate dust fast. Once you have cleaned the check valve, you can repeat the test we mentioned above to see if it allows airflow in the right direction.
You may notice a broken part on the check valve if you have been using the compressor for years. In this case, you should replace the check valve. Alternatively, you can replace the part that is broken if you don’t have the cash to immediately replace the check valve. For instance, a broken disc in the check valve can be replaced. You should, however, know that replacing such parts is only a temporary fix. Therefore, start planning on how to replace the check valve as soon as you can.
Final thoughts
A check valve plays a significant role in a compressor. It ensures that the air flows in one direction. The check valve contains an internal disk that opens to let the air pass forward. It closes when the airflow speed reduces. Since it comes with different ports, it prevents the air from flowing back, thus keeping a particular amount of pressure on specific parts of the air compressor.
Sometimes, the check valve may get faulty and lead to problems such as unusual noises, air leakage, and slow pressure buildup. If you suspect such problems, you should blow through it to confirm if the air flows as expected. If not, you can fix the check valve by cleaning it or replacing a broken part. Replacing the entire check valve can, however, give you a permanent solution to the problem.


