Solar panels have a power rating given to them by manufacturers. A power rating tells you how much power the panels will produce under ideal conditions. Ideal conditions do not always exist. And if they do, it may only last a few short hours of daylight. That’s because many things can affect how well your solar panel system functions. In that case, you need to test the solar panels yourself. It’s the only way to know your system’s real output. You will learn if there are any adjustments you need to make to your solar panel setup. And we want to help you do that. In this guide, you will find all the information you need on how to test solar panels.
Table of Contents
When To Test Solar Panels
It is advisable to test your solar panels even before you have them installed.
Before you mount up your solar panels, you need to have them tested. That way, you can weed out the ones that do not work or are glitchy. It’s also a great way to find the correct location for your solar panels. You can move them around the mounting surface to find which area will produce the most power.
From then on, you can continue to check the system from time to time to ensure that the cells are not failing.
Grid-Tied Solar Panel Systems
There is a process to getting a grid-tied solar panel system connected to the grid.
One of the things you have to do in this situation is secure a connection with the grid. To do that, you need permission from the electricity company.
You will have to submit an application. The electricity company then sends a representative to inspect your solar panel setup. That is to ensure your system works and that it’s not a potential electrical or fire hazard. And in the case of grid-tied systems, testing will also ensure that you do not cause a power outage.
One of the things the representative will do is test the power output of your solar panels.
They will install a bi-directional meter. This meter monitors how much energy your system will produce. These meters work in two ways. They monitor your energy consumption from the grid. But they also give a record of the amount of energy you export back into it. So it keeps a close eye on the performance of your system and reports back to you and the electricity company.
If there are any changes to your solar panel output, you will see them reflected in your electricity bill. But the meter cannot tell you what is wrong with your system. In that case, you will have to test it yourself.
A good way to ensure the inspection process goes well is to test the system beforehand. In so doing, you can identify any problems and have them sorted out ahead of your inspection date.
Off-Grid Solar Panel Systems
If you are off-grid, you will not get that initial inspection from the electricity company. You also won’t have a bi-directional meter monitoring your system’s daily output.
Testing an off-grid system before turning it on falls to the owner and the installer. Most solar companies will provide a device that helps you measure the output of your system.
But the testing should not stop there.
After that initial test, it is wise to continue monitoring the output of your panels.
Why Should I Test My Solar Panels?
I mentioned earlier that solar panels perform at 100% under the best conditions. But many things can stand in the way of that. Even so, it is possible to achieve the best results for the area where you live. The first step to being successful is through testing.
Hours of peak sunshine is the main thing that can reduce the productivity of your panels.
Four Peak Sun Hours Every Day Improves Solar Panel Output
The main thing that determines the power output of your solar panels is the hours of peak sunshine. That is the time when sunlight reaches 1,000 watts of energy in an hour. During this period, a 100-watt solar panel produces about 100 watt-hours of electricity.
But several factors can interfere with peak sun hours. Your panels need at least 4 peak sun hours everyday to live up to their capacity ratings. Here are a few things that can affect peak sun hours.
Shade Affects Solar Panel System Output
The cells in your solar panel respond to sunlight. If there is shade interrupting the light from reaching even one of the cells, the performance of the panel can drop by up to 40%. You can expect this to happen in standard solar panels. There are newer, improved models created to solve the issue of shade.
Solar Panels Need Ideal Temperatures
Solar panels perform best within a particular temperature range. That range from between 59 degrees Fahrenheit to 95 degrees Fahrenheit. And if you work with degrees Celsius, that’s 15 to 35 degrees.
If the temperature rises past that maximum number, the output of your system will drop. The same happens if the temperature drops below ideal.
Use The Correct System orientation
One of the ways to get the most out of your solar panels is by installing them the right way. A solar system setup should face a particular direction to make the most of peak sun hours. The angle or tilt should also be specific to produce the best results.
Panels that face the south perform better than systems positioned in other directions. And to get an even better result, they should be sitting at a 45 to 50-degree angle.
System Geographical Location Impact on Solar Panels
Locations further away from the sun receive less sunlight. That’s because of the way the earth tilts on its axis. Solar panels in these regions produce electricity below their power rating.
Seasons Can Affect Solar Panel Performance
Seasons and weather conditions do have an impact on solar panel system production. In the summer months, when the days are longer, your system will work well. But winter days are shorter and, most times, cloudy. During that time, your solar panels receive less sunshine so, you can expect a lower output.
Your solar panels may not live up to their power rating. That does not always mean that there is something wrong with them. The problem could be a lack of ideal conditions.
You may need to invest in more panels. Or it could be a simple matter of repositioning.
Testing is one way to keep up with the things that affect your solar panel output. It will also help you figure out how to correct the performance of your system.
How To Test Solar Panels Output
Taking care of your solar panels is a good way to get them to last and work well. They must stay clean to ensure that sunlight reaches the cells. But appearance isn’t everything. The way your solar panels look cannot reveal anything about the way they perform. For that, you need to measure the voltage and amperage of your system.
What You Will Need
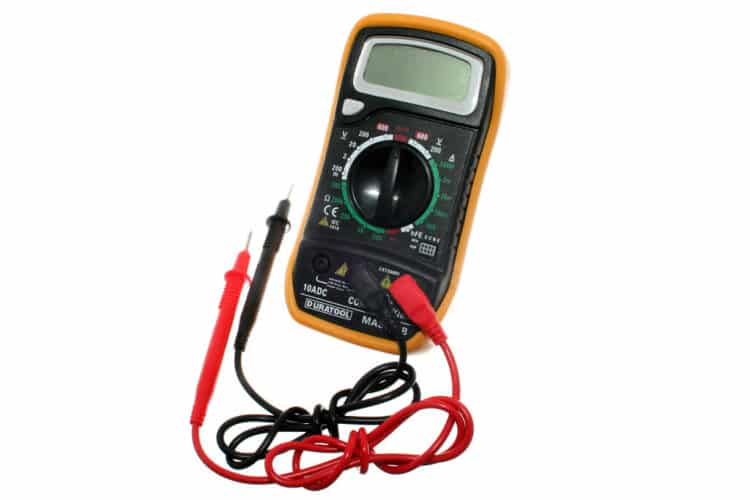
Other than your solar panels, you will need a multimeter to test your system. There are two styles of multimeters you can choose from.
If you have an ammeter, you can use it to test the amperage of your system. But a multimeter can do the job of an ammeter just as well.
- Manual Multimeter
With these devices, the user sets the testing range. - Auto-Range Multimeter
These devices select the testing range you want to measure.
You can use either one of these devices to test your solar panels.
Before you get started with testing, there are a few things you need to do.
What Power Rating Do Your Solar Panels Have?
We mentioned this earlier. Your solar panels have a power rating. But the power rating is tested under ideal conditions in a laboratory. That’s the amount of power they can produce in the right situation. After those tests, they hit the shelves. The area you install your panels most likely will not repeat those ideal conditions.
To test your solar panels, you need to know the exact power rating of your system. Check the back of your panel to find the voltage and current of your system.
Use The Best Sunlight Conditions
Confirm that the light conditions in your area are right for taking power readings. Unhindered radiant sunshine must make direct contact with the panels. That’s the only way to achieve the desired results.
Remember, without the sun: there will be no solar power. Do not test your panels indoors or in the shade.
Learn How To Use A Multimeter
If you do not know how to use a multimeter, you should get acquainted with it before doing the test. Using the multimeter the wrong way can damage your system. Set the multimeter the right way to avoid destruction.
That means, you need to use the correct settings for the type of power you will be measuring. Using the wrong setting could damage both the multimeter and the panel you want to test.
If you have a manual multimeter, remember to choose the correct function. Adjust the function to DC voltage if you want to test the voltage. Set it to amperage if Amps are what you need to test.
If you have an auto-ranging multimeter, press the DC/AC button. The device will do the rest once it makes contact with the terminals of the solar panel. But we will explain more of this in a bit.
Charge Controller Testing
For charge controller testing, ensure the battery is not 100% charged. Otherwise, it won’t accept current.
Solar Panel Testing, What To Do First
You only need the solar panels for the first measurement.
- Disconnect the solar panel from the regulator. Only then should you do the same with the regulator and the battery.
- When reconnecting, do the opposite to prevent damage to the regulator. Attach the regulator to the batter first. Then connect the panels.
Now you are ready to perform the test.
Measure The Amperage Of Your Panels
To complete this step, you can use an amp meter. If you do not have one, a multimeter will do. Multimeters perform many functions. Testing amperage is one of them so, you can use it to test your panel in the absence of an amp meter.
- For best results, perform this test where you plan to or already have your system installed.
- Ensure that the panels receive the full glare of the sun or the amount of sunlight it receives every day. That way, you can ensure you get the right reading.
- Connect the probes. Use every precaution when performing this step. You do not want to blow the fuse in your device. To avoid this, set the max average sensitivity high above the reading you expect to get. Then connect the probes the correct way.
Your panels have a positive terminal and a negative terminal. Your tester has a positive probe and a negative probe.
The red probe is positive and so should connect with the positive solar panel terminal. The black probe is negative and has to make contact with the negative solar panel terminal.
Measure The Current In The Solar Panel
To complete this step, you also need to use a multimeter and a variable resistor box. These devices give different resistance level readings.
Once you have your tools ready, here is what you need to do.
First, read the manual and remember, your panel has to receive the amount of energy from the sun as it would every day.
- Find the junction or converter box.
It should be behind the panel. If there is a covering, take it off. - Adjust the multimeter to DC power.
Adjust the voltage level on the multimeter so it does not damage your panel.
Ensure the voltage is higher than the rating of the panel. - Connect the solar panel and the multimeter.
Apply the positive clips to the positive connector. Apply the negative clip to the negative connector. Doing this will give you an accurate reading. - Turn the multimeter off.
- Disconnect the multimeter from the panel.
Your test is almost complete. Now it’s time to calculate the wattage of your system.
How To Calculate Solar Output
- Multiply the amperage to got by the voltage readings.
Ampxvolt= Watts – The result you get will give the wattage. - Multiply the wattage you get by the average sunlight hours your panel comes into contact with every day.
Watts x sunlight hours
To get the best results, perform these tests during peak sunlight times of the day.
Testing Solar Panels Is Easy
Once you set up your solar panels, the first thing you need to do is have them tested. But it should not stop there.
Equipment, appliances, tools need maintenance. Solar panels are no different. They need regular inspections a few times a year to ensure they keep working the way they should. One of the ways you can check your solar panel setup performance is with regular testing. And it’s a good thing you can do it yourself.


