A solar powered-lawn mower is a fantastic tool for your household. It’s not only friendly to the environment, but it’s also easy to use.
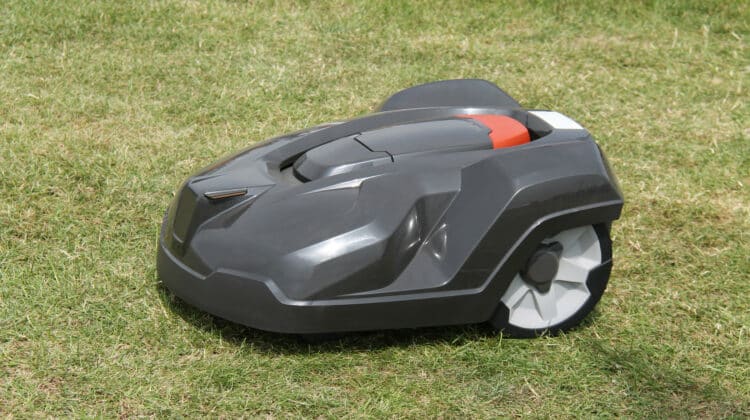
Some newer models have become so advanced and high-tech that you won’t have to move a finger, and it can mow your lawn of its own volition. These are robotic auto-mowers, which functions like Roomba vacuum cleaners (this will be discussed in a later segment).
If you are planning to get one for your own, you have to know the specifics first. So that you can utilize it to its maximum potential, and later you will learn the steps in setting it up.
Table of Contents
Solar-powered lawn mower introduction
Solar power energy was first conceived because of the unrelenting fuel cost increases that didn’t seem to back down. There was also the prevailing problem of gas emissions from fuel burning and going into the atmosphere and slowly destroying it.
It, in turn, demanded the usage of readily available and copious amounts of solar energy to compensate for the continual issues from fossil fuels. People began retrofitting solar panels to current household devices and inventing equipment to use this abundant energy from the sun. Thus, a solar panel mower was invented.
It is described as providing energy from the sun to power its motor, which forcibly rotates the blade to cut the grass on the lawn. It was created and developed in adopting the principle of lawn mowing.
Here are its main components:
- DC or direct current motor
- rechargeable battery
- Solar panel
- Control switch
- Stainless steel blade
Mowing is accomplished by the motor that supplies the needed torque to propel the steel blade. It is also directly connected to the motor’s shaft.
It functions by turning on the control switch that allows the circuit to close and enable the current to flow towards the motor. It then forces the blade to be utilized to mow the grass. Its batteries are charged via the solar charging controller.
Many different designs were created and are particularly fitted to a specific convenience or necessity. Over the years, people have modified its power, efficiency, and speed. Thus, making the task of grass-cutting become easier.
Sunlight has a surplus of energy readily available for the many needs of planet Earth. Every minute the sun emits approximately 5.68x 1026 calories of energy, and the planet only acquires 2.55×10¹⁸ calories. These constitute only 2k millionth of the total energy beamed to outer space.
The sun’s entire energy source is approximated to be 30k times greater than the whole planet’s yearly energy.
In the meantime, a solar-powered grass cutter generally follows the same principle as other mower models. The only difference is the origin of the energy source. It utilizes a photovoltaic panel to render the necessary power for the mower.
Along with this, there many misconceptions involving a lawnmower utilizing a different power source other than electricity or gas-based ones.
One is that it will be relatively harder to use. It isn’t true because it will eliminate habitual trips to the gasoline station, and potentially dangerous spillage and emissions won’t happen anymore.
This kind of mower will help to lower down the noise and air pollution brought about by others types. Also, it will cut down on maintenance and operating costs you used to have with the others.
Robotic auto-mower
If you are usually the one given the task of mowing whenever your lawn grass becomes too tall for comfort, you already know the rigors of the job. Usually, you walk in a straight line, from one side to the other, holding the mower securely as if for dear life.
You are exposed to nasty gasoline emissions hitting your face from a two-stroke engine and trying desperately to contend with an ear-shattering noise from the engine.
A new type of solar-powered lawn commercial lawnmower has hit the market recently. It has the appearance of a futuristic self-driving car, which in some respects, it is.
It works like a Roomba vacuum cleaner, but instead of sucking the dirt out from a carper, it cuts your grass. It is powered by sunlight and doesn’t emit any harmful gasses.
Here are its four main parts:
- Body
- Charging station
- Transformer
- Perimeter wire
Its body is made from recyclable materials and has the same size as a small piece of luggage, measuring about nine by fourteen by twenty-two inches.
It gets most of its power from the photovoltaic solar panel fastened on its back. It also has a rechargeable eighteen-volt NiMH battery.
It does not use oil or diesel to power it. When the sun is brightly shining, it will directly use the energy from the sun’s rays rather than its battery.
This type of mower has a built-in and programmable alarm system that can keep it focused on the grass and not your prized rose garden.
You have to install a wire perimeter on the edges of the lawn, usually buried underground. It is done to set the boundaries of the robotic mower so that it won’t go elsewhere it’s not wanted.
There are also guide wires that direct the mower back to the charging area. While both wiring schemes in place, the mower’s ultrasound sensors and navigation system (situated at its back and front) act as its eyes and directs itself where to go, thus avoiding the rose garden.
Once the boundaries are in place, it makes crisscrossing patterns on the yard until it is done. If it bumps into any big obstacle like a boulder or parked car, it will back up and begin its mowing duties in another part of the yard.
If it comes across a perimeter wire, its navigational capabilities guide itself around. It can even go uphill in a thirty-five percent gradient higher than that it will whirl backward.
Since the grass is cut frequently, the cuttings immediately rot and turn to mulch that the device can distribute in cuts done in the future.
The solar panels are charged on sunny days, which enables ten hours of nonstop cutting, with an area of about a quarter of an acre.
When its battery is becoming low, it will know it and automatically scuttles towards its designated charging station. The mower senses it when it is about twenty feet away. It connects itself to a transformer that plugs into a one hundred twenty volt wall socket.
Compared to a regular mower whose noise level is about one hundred decibels, this robotic type can only reach about sixty-three decibels.
If you think it might be scared that a robot equipped with sharp blades knows its way around your lawn, well, don’t. It’s only a tiny device weighing about twenty pounds and poses no threat at all.
Lawn-mowing has reached newer heights in technology with the robotic-auto mower. If you can afford it (the price is about 2k to 3k US dollars) then get it now to avoid the hassle of manually mowing.
Setting up your regular mower to become solar-powered
If you have a conventional mower that runs on batteries and wants to turn it into a solar-powered lawnmower project, there is a way to do it.
But first here are the materials and tools that you need:
Materials
- Battery-powered mower
- Double-stick tape
- Two 12 volt photovoltaic solar panels
- Solder
- Four general purpose rectifier diodes
- Washers, nuts, and bolts
Tools
- Wire stripper
- Soldering iron
- Screw driver
- Volt meter
- Wrenches
Assess the condition of your mower
The biggest problem with battery-powered mowers to keep them running is that it needs to be fully powered to function correctly. That means you have to take it near an electrical socket and constantly charge it.
With solar panels, you won’t have to look for an electrical socket to charge it. You would only leave it under the heat of the sun and get it charged in full.
The first thing that you need to do is to check on the status of its rechargeable batteries. If it is still functional, continue to the next step. If it is already unusable, then you have to get new ones.
Be sure to keep it taped together to make it easier in the later steps. Use double-stick tape to stick each battery together.
Wiring it up
A PV or photovoltaic solar panel’s power output is based on watts. Whenever the sun is shining brightly, the panel’s solar energy potential is more outstanding than the rechargeable batteries.
So there will be a surplus of energy flowing from the PV panes towards the batteries. However, when the sun disappears, the power will flow back from the batteries to the panels, thus draining the energy. So, you need to do something to counter it.
The way to prevent that from happening is to set up diodes within the circuit. Diodes function as an electrical one-way check valve. It enables the panel to charge the batteries, but the batteries can’t heat them.
If you have four six-volt batteries, they can be charged by twelve-volt panels. The total system voltage would be twenty-four volts. When the batteries are lined and stuck together, the voltage will add up.
Since the panels are twelve volts, they need to be isolated from one another, which is accomplished by the diodes.
Connecting the batteries
Since there are four batteries, hook them together in two by two, so that there will be twelve volts per pair. Use a voltmeter to check if that is the case since it’s the amount of energy each solar panel can supply.
Link up the two battery sets with an interconnect cable. It will be used later to fast the panels. Use a wire stripper. Don’t cut it, only rupture it and take apart the insulation.
Set up power taps
This step follows the same process as the previous, wherein you will rupture (not cut) the positive power lead and fasten the diode. Be sure the diode band is nearest to the red wire.
Do the procedure again
Go through the same process on the negative side. The only thing different is that the diode band is not facing the black wire.
Look for additional materials
You will need a heat source to connect to the solar panel, which can be supplied by a cigar lighter plug. Then cut it and be sure to leave about one foot. Also, strip the ends.
Carry on with the wiring
At this stage, you will be connecting the solar panel’s power plugs to the power taps. Before soldering the diode to the wire, slip the heat shrink tubing all around the wiring.
Fasten the wiring to the diodes and solder them into position. Then slip on the shrink tubing around the diode and the diode and further shrink it to provide insulation for the joint.
Be sure you have the correct polarity, so check if the stripped wire from the panel shows a plus (+) sign. Ensure that this particular wire is linked to a diode that aims to a batteries’ positive terminal.
Recheck the wiring
At this stage of the process, the batteries are wired to two connectors through the diodes. Check if there is no remaining voltage by a voltmeter. The diodes function as an electrical one-way check valve that goes from the solar panels towards the batteries, not the opposite.
Check all the wiring again with the voltmeter to make sure you can continue to the next step.
Attach the solar panels
There are holes on panels shaped like keyholes. Put a screw in and tighten the nut. It is for the stud mounting. Line up the stud on the cover and drill holes to mount the panels.
To adapt to the motor cover’s shape, cut spacers.
Once the panels are mounted, direct the wires towards the motor cover.
Check the power output of the panel
Both panels’ OCV or open circuit voltage should be from sixteen to twenty volts. It should show that in the voltmeter.
Attach the battery banks to the solar panels. Each bank should have twelve to fifteen volts, and both should have twenty-fours plus volts.
Conclusion
It is finally done, and you can now use your newly retrofitted solar panel mower. Cut down grass as you cut down your carbon emissions.


