Do you feel like you’re driving through a beaten up country road each time you back-up your car in the driveway?
If your home is surrounded by cracks and pits, it’s about time you start thinking about doing a DIY resurface asphalt driveway project.
Doing a DIY repair and reseal project on your asphalt driveway is an easy project that’ll save you hundreds of dollars in maintenance costs.
Improve your home and keep your family safe from accidents by stepping-up your driveway maintenance game.
Table of Contents
Asphalt pavement maintenance
If you want your home to look beautiful without spending your life savings, it’s best to start investing in home maintenance to avoid future repair costs. This applies to maintaining the quality of your home pavement.
Due to wear and tear, cracks and pits will inevitably appear on your pavement. The secret to making your driveway and pavements last longer is by sealing cracks and pits ASAP.
Why is asphalt driveway maintenance necessary?
The biggest mistake you can make is waiting too long to treat the patch. You’ll only make the repairs more complicated while increasing repair costs.
You might think that a small crack isn’t a big deal, but we’ll draw the picture for you.
Your pavement expands and shrinks due to exposure to changing heat and temperatures. That small crack will eventually turn into a large pothole because of the constant stress it’s exposed to.
If you seal the crack immediately, water and other debris that is likely to expand due to temperature changes won’t get in the cracks and damage your pavement. This will increase the service life of your asphalt pavement.
Repairs will usually involve crack filling/sealing as well as asphalt patching.
Crack sealing is used to fill up smaller pavement cracks. Patching is the process of removing unsound asphalt until strong asphalt is exposed.
The process involves refilling the base with fresh asphalt. The pothole is compacted and cleaned before tack is applied to effectively bond old and fresh asphalt.
Immediately doing asphalt repair and maintenance is the most cost-efficient way to preserve:
- Pavement structural integrity
- Pavement quality
- Lifespan of your asphalt driveway and parking lot
Remember that regular crack filling, patching, and sealcoating are necessary steps to asphalt pavement maintenance. These will prevent potholes from forming, as well as ensuring that your pavement remains structurally sound.
Types of asphalt pavement crack filling and sealing
There are different types of crack sealants and fillers. These will depend on the method used to apply the repairs and maintenance.
Hot vs Cold Driveway Sealer
Cold Appllied Crack Sealant
Cold asphalt repair is a cost-efficient and effective way to treating cracks and erosion on asphalt pavement.
This method is usually done on asphalt parking lots or driveways, but it’s also applied to some road and street repairs.
Cold sealants and crack fillers are usually made of clay and polymer-modified emulsion substances that easily fill-up cracks at ambient temperatures.
Hot Applied Crack Sealant
Hot pour crack fillers are usually involved in large scale repairs of roads, highways, and parking lots.
These involve large machinery that melts rubberized asphalt that will fill-up cracks and potholes.
Hot pour sealants give the convenience of a fast dry time of around 10 minutes. As soon as the asphalt cools down, you can drive on a sealed driveway.
How to resurface asphalt pavement?
If you think that a resurface asphalt driveway project is complicated, you’re in for a big surprise! We’ll give you a step-by-step guide to keep your driveway last longer and look brand new.
We promise you that you’ll learn asphalt driveway maintenance tips after our comprehensive sealcoating tips.
You might just have your new driveway up and running before you can even learn how to parallel park on it!
Steps to asphalt pavement filling and sealing
Buy your supplies
The first thing you need to do is to evaluate your pavement and project specifications so you can choose your supplies and tools.
The factors you need to consider when selecting your sealant is:
- Climate
- Pavement condition and quality
- Service life expected from the pavement
- Sealant properties
For cooler climates, it’ll be ideal to go for a more flexible sealant. Expect that your pavement will be exposed to swings in thermal movement, so don’t buy a stiff sealant that will likely crack.
Hot climates will usually mean that there is less movement of the pavement, so go with a less flexible sealant. Soft sealants in a hot climate will likely cause tracking from pedestrians or vehicles.
Another important factor to check is sealant job type. Sealants are specially formulated for a specific purpose: roadway use, pedestrian exposure, and even parking lots.
Go for a sealant that is specifically designed for the area you have in mind. These will vary in material flexibility and tackiness.
Remember to check crack density before choosing a sealer.
For pavements that have a 20% crack density, choose a more flexible sealant. You can go with a stiffer sealant for pavements with a higher crack density.
You can figure out crack density by observing a 10×10 foot section of pavement that will most likely represent the average condition and quality of the driveway.
Measure the linear feet of cracks within that section to get the crack density.
Check the weather and preparing the driveway for asphalt paving
Resealing your asphalt driveway will be faster than you expect. Simply set aside a morning to finish all the repair work.
Make sure to pick a date that has clear skies and sunny weather for about 24 to 48 hours to allow the tar to dry. Most pavement repair companies will require a temperature of at least 40 degrees for the best result possible.
Begin by rolling the pavement crack filler rope onto a warm and sunny part of the driveway. This will allow the sealant to soften for easy filling operations.
While your crack sealant is warming, begin cleaning the area from debris, dust, leaves, and weeds that can get in the asphalt cracks. Use a leaf blower or a broom to efficiently clear the area.
For clearing cracks
Use a wire brush to effectively remove dirt and debris from a crack. You can also use a vacuum as well as a leaf blower to remove smaller particles.
For oil stains
For oil stains, use a degreaser or a primer to efficiently clean the area and remove visible stains.
For moss growth
For areas that are prone to moss and growth, it will be best to use a pressure washer with a 15-degree cleaning tip. For stubborn algae and moss, you can use bleach and a scraper to ensure that the cracks are debris-free.
It’s labor-intensive work, but you need to make sure that all cracks are free from any debris. You can use a flat screwdriver to scrape away any remaining dirt in the small cracks.
For hairline cracks
For hairline cracks, a little more effort will be needed. You’ll need an angle grinder and a diamond wheel to widen these small cracks to effectively clean them.
To widen a hairline crack, use the diamond wheel to deepen one side of the crack. Drag backward to remove the old filler and to widen the crack.
You can also use a chisel and a hammer to remove any unsound and broken asphalt.
According to pavement repair professionals, sealants can crack or be pulled off if the surface it’s sticking to is unclean or if pavement quality is questionable.
Once the pavement surface has been cleaned, and all cracks are cleared, make sure to blow out excess dust and debris. The area should also be dry.
You can use a leaf blower, but a compressed air gun would be a better choice. Make sure that the air gun has sufficient air pressure and velocity that can remove the remaining water and small particles.
It’s recommended that you choose a compressor with an air pressure of at least 90 PSI. For the best results, keep the nozzle at least two inches from the surface.
It’s recommended to walk forward and fan the pavement to remove all debris from cracks.
Although more complicated and expensive, these equipment will ensure that your pavement gets the best clearing and cleaning treatment possible. Consider looking into:
- Vacuum systems for pavement sensitive to air quality and compressed air
- Wire brushing to remove stubborn adhesive coatings
- Hot air lance for removing excess moisture and water
Regardless of the clearing method you choose, remember to wear safety goggles and a mask to prevent any respiratory and eye problems.
Insert the driveway crack filler
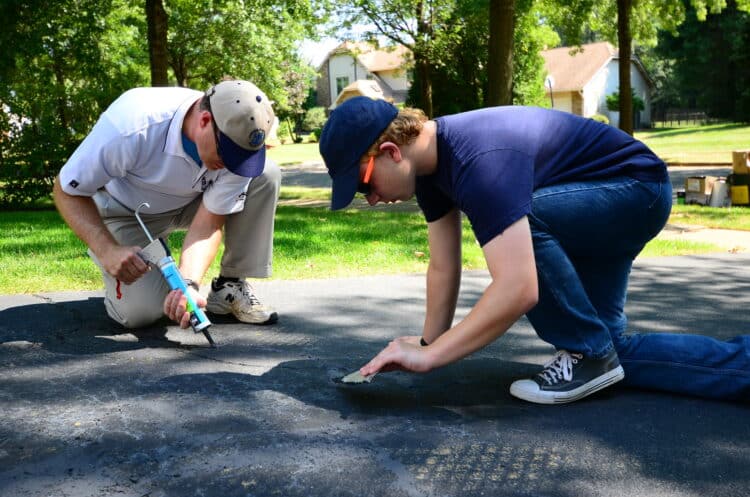
Compress the sealant into the cracks using a flat-blade screwdriver. You can add more layers of the crack sealant for deep and wide cracks.
Be careful not to overfill the cracks. The crack fillers should be at least a sixteenth inch below the pavement’s surface.
You can use a hammer to compress the sealant into the crack.
Take your time repairing cracks and holes to get the best results.
For patching cracks
For cracks that are less than half an inch deep, you can opt to use a crack filler bottle for convenient application.
You can use a caulking gun to make things easier, but if it’s not available, carefully pour the filler into the crack.
These substances easily level-out and smooth over the cracks, but be careful not to overfill them. If the cracks are overfilled, these will be noticeable once you apply the final coat of sealant.
Use a scraper to even out overfilled cracks. These will dry in about four to eight hours.
For patching holes and deep cracks
For holes and cracks that are greater than half an inch and have caused significant damage, the patching process will be more complicated.
Large asphalt damage is usually caused by contamination from motor oil and other coolants. Repetitive freezing and thawing of the pavement will also cause large holes and pits.
You will need to use an asphalt patch filler. Enlarge the filler mound and smooth over the area using a broom, the back of a shovel, or a trowel.
Pour more driveway filler as needed. If the hole is deeper than two inches, you can fill it up with crushed and angular gravel.
Make sure that to compact the gravel with a wooden post or a steel tamper.
You can then fill the hole with cold-applied asphalt. Use a squeegee to smooth over the pavement surface.
Wait at least four to six weeks before applying a final sealant over a driveway patch.
For applying sealant near structures
If your driveway comes in close contact with a structure, like a building or a sidewalk, it will be best to seal these edges by hand.
Use a paintbrush to carefully apply sealants around the edge.
For applying sealant over large areas
You can use a squeegee to smooth out most of the surface, but using a paintbrush will give you precision for cleaner results.
If you’re using a squeegee, make sure to pay close attention to the amount of pressure applied to the sealant. Pushing too hard will cause surface irregularities, while pushing too little will result in coverage that is too thick.
Melt the driveway crack filler
Before you fill in the cracks with the sealant, make sure to check the manufacturer’s instructions on material temperature and maintain it that way.
If a sealant is under heated, it will fail to adhere properly to the pavement surface. Make sure to stop sealing operations until the material has reached the ideal temperature for application.
On the other hand, overheating the sealant will damage the properties of the sealant ingredients. This may cause difficulty in handling the material and continuing the application process.
It will be best to discard the sealant and heat-up a new one.
Use a flame torch to slowly heat the crack filler. Use a sideways motion over a foot-long section to thoroughly melt the sealant.
Sealants and fillers melt easily. There is no need to rush the process: simply use the flame’s tip to melt the filler.
Run the torch again over the sections until the crack filler smooths out into the crack. If there is some excess filler, simply cut it off with a knife or compress it into the crack.
If you notice the crack filler burning, you can try a faster sweeping motion or move the flame further away from the crack.
Add the trowel mix
Once the crack filler has cooled after about 20 minutes, you can start adding the trowel mix.
Scoop up some of the pavement patch and place a small mound on top of the crack filler. Smooth out the mix with a trowel and let it try for 24 hours.
Once the seal is dry, you might notice that there are still some cracks and depressions. Apply a second coat to get a stronger seal that protects the surface.
How long does sealant take to dry?
Make sure to close-off your pavement while the sealant is drying.
Wait at least 24 hours before allowing foot traffic over the area, and at least 2 to 3 days before you drive over it.
Sealcoating
Now we come to the most important step of pavement maintenance: sealcoating.
Due to constant stress and changing weather and temperature, your asphalt will undergo wear and tear no matter what you do to keep it pristine.
To protect your property from environmental stress, you need to apply some good quality sealcoat over the pavement. Experts recommend sealcoating every 3 to 5 years to preserve the structural integrity of your pavement.
Schedules for sealcoating will depend on:
- Weather and temperature fluctuations
- Foot and vehicle traffic
- Quality of previous sealcoat
According to maintenance professionals, this is the step to repairing asphalt pavement when things go wrong.
For DIYers and contractors, make sure to carefully check manufacturer instructions on mixing and applying the sealer. Knowing what kind of pavement sealer you bought is important to apply the right process.
One common mistake is failing to add sand to the sealcoat mixture. Sand adds necessary friction to the surface after it has been sealed.
Most contractors will disregard this part because of lack of knowledge or because of unavailable machinery that could handle the materials.
Failing to sealcoat properly can result in accidents and personal injury, which can lead to complicated lawsuits.
Conclusion
Have you been bumping your head on your car ceiling every time you go through your driveway?
The first thing you come in contact with when you get home is your driveway. You know you’re a good homeowner if you’ve invested in quality and safe driveways and parking areas!
Do yourself a favor by fixing up your pavement.
With our DIY resurface asphalt driveway guide, newbies can get started on improving their homes.


